Thursday, November 29, 2012

Parshat Vayishlach, Division, and Odd & Even Numbers


Some heavy concepts in this week's parasha: Yaakov preparing for what he thinks will be a war with his brother, Yaakov fighting the angel,the rape of Dinah, the death of Rachel during childbirth, and some genealogy.

We mainly focused on Yaakov's preparation for the fight with Eisav and then the surprisingly loving and peaceful meeting with Eisav.

We discussed Yaakov's tactic of dividing his camp into two groups in order to keep one group safe in case of an attack. This lead into a discussion on grouping and odd and even numbers.
We pretty much took any assortment of objects and placed them all in one group and then divided them into two groups. We assessed if the groups were equal or not. This branched into a conversation about odd and even numbers since not all of our groups could be made equal.

This is a fun book about cousins who are driven by their love for anything even or odd. 

Here is a cute little video on the topic: 


Vayetzei and Classifying Rocks

My apologies, we are behind again with our parasha work. Here is an interesting extension activity to be done with Parashat Vayeitzei. Rocks seem to be a focal point in last  week's parasha. Yaakov rests his head on rocks before he  the dream of the ladder and rocks are used in the pact made between Yaakov and Laban.

So here are some preschool Earth science activities all about rocks I found on teachpreschoolscience.com:

Classifying Rocks
Photo Source

  Learning Experience

Possible Discoveries
Craft Activities

   
  • Go on a neighborhood walk  to collect rocks. Ask children to  search for a variety of sizes, shapes, and colors. 
  • Set out your rock collection and examine the rocks. Describe their features: texture, color, size, etc
  • Sensory activity- Dump a bucket of dirt from outdoors into a box. Sift trough the dirt to pick out all the rocks.
  • Discuss fossilized rocks.
  • Submerge rocks in water and track the changes over time.
  • Try to guess by looking at the rocks, which one is the heaviest and then weigh them.
  • Paint a “Pet Rock”, 
  • Glue pebbles to decorate a card or frame. 

Tuesday, November 20, 2012

Simplicity Parenting

Thank you to my friend and colleague who recommended this wonderful book to me. Simplicity Parenting is about just that, simplicity. Our society has become too rushed, too complicated, too stimulating and our children are feeling it. Kim John Payne provides a step by step approach on simplifying almost every aspect of a family's life, from toys to clothes to meals to extracurricular activities. 

I am currently reading his chapter on simplifying the child's home environment. The author states. "As you decrease the quantity of your child's toys and clutter, you increase their attention and their capacity to play."

Now I have always prided myself on not owning too many toys. We only have a few toys from the major kid toy categories, but we are nothing like the families Payne writes about...or so I thought. As I read on and started to really think about my girls' play habits, a few troubling observations came to mind:
They rarely are engrossed with their toys.
They spend way too much time fighting over or about toys.
They often walk into their toy room and come out empty handed with no clue what they want to play with.

Could it be that even our "small" toy collection is too overwhelming and contributing to their negative play behaviors? 
I figured, I would give Payne a try and did as he suggested: pile up all your toys in the living room and just gawk at your toy accumulation.
So here is our toy collection (plus a suitcase full of books) which I still think is not "that bad". 

But I figured, I'd continue with this process and wean out the toys Payne calls "Toys Without Staying Power":

  1. Broken Toys
  2. Developmentally Inappropriate Toys 
  3. Conceptually “Fixed” Toys 
  4. Toys that “Do Too Much” and Break Too Easily
  5. Very High Stimulation Toys 
  6. Annoying or Offensive Toys 
  7. Toys that Claim to Give Your Child a Developmental Edge 
  8. Toys You Are Pressured to Buy
  9. Toys that Inspire Corrosive Play
  10. Toy Multiples
 
So let's have a look at the before and after of our play room:

BEFORE:

AFTER:


So the differences are pretty huge:  less clutter, less choices, easy accessibility, and clear labeling.

My post-op observations: 
1. They ACTUALLY played and played imaginatively and attentively
2. Having toys in cubbies without a bin was great for my 2 year old. She just pulled her toys out and really played with them. No help needed from me.
3. The girls spilled out tokens from a board game and poured them back in for like 10 minutes while singing the word "teamwork"--I kid you not!
4. Choosing books for "library time" was quick and easy due to the lack of clutter and easy visibility of books.
5. Clean up was a breeze for the kids to do themselves, because there wasn't as much to clean and they knew exactly where everything went.

I'm a believer: simplicity might just be the answer.
Stay tuned for other ways we will be simplifying our existence.


Sunday, November 18, 2012

Great Resource for Jewish Montessori Activities

A Jewish Homeschool Blog deserves mention again for a great resource created for Sefer Bereishit.
Click here to find a link to download Montessori Activities for Chumash Bereishit. All of these activities are wonderful and engaging.


Tuesday, November 13, 2012

Parashat Toldot and the 5 senses


In  Parshat Toldot twins boys are born to Rivkah and Yitzchak. My husband is a twin, so we just pulled out some photo albums and we were good to go with that concept.

This week's parasha also tells the story of Yitzchak blessing his sons before his death.
  Yitzchak is growing old and blind and tells his son Eisav to hunt some food for him and when he returns he will bless him. Rivkah overhears and tells Yaakov to impersonate as Eisav in order to receive his brother's blessings. She dresses him in Eisav's clothes, covers his skin with goatskin, and prepares food to give to Yitzchak. Since Yitchak's vision was poor, he had to use all of his other senses to determine who was the man standing before him. 

We spent some time role playing how Yitzchak used his senses and then expanded our lesson to other activities that teach about our five senses
See chart below:

Senses
Yitchak’s use of senses to discern who stood in front of him to receive his blessing
Parasha reenactment
5 senses expanded lesson
Sight
Poor Vision
Blindfold child to have them use their other senses to figure out who or what is in front of them.
Place a few object for child to see, tell child to close their eyes while you remove one of the objects. Have them guess what went missing. Great visual memory task!
Hearing
Listening to speaker’s voice
While blindfolded listen to other’s speak and guess who is talking to you
Have child turn their back to you while you play a variety of real/toy instruments. Child guesses the instrument.
Taste
Tasting the food brought to him
While blindfolded try to guess what you are eating.
While blindfolded child tastes a variety of foods and describes them as sweet, salty, sour, etc
Touch
Feeling the skin of person in front of him
While blindfolded, have child say feel the skin of your arm vs. an arm covered with a wooly sweater
Place different shaped items in socks and have child feel outline of object with their fingers to describe the shape they feel. We drew the shapes as well before opening the sock.
Smell
Smelling the person while giving him a kiss
While blindfolded, have you child give a kiss to you or siblings and guess who they smell. We did this one with my mother and it was a lot of fun for all!
Put different scented materials into containers with holes on top. Children can guess the smell or have two of the same scent for children to match.

Sunday, November 11, 2012

Thanksgiving Preschool Crafts: Giving Thanks


Since Thanksgiving is less than two weeks away and we are continuously trying to plant the seeds of gratefulness in our girls we spent the day creating Thanksgiving crafts and focusing on what we are grateful for. 

We started with this really sweet Thanksgiving hand print tree 
 Trace and cut outline of child's forearm and hand from paper bag. 
Before assembling tree, moisten the hand print tree and crinkle it up. After it dries, it will have a weathered look to resemble a tree trunk.
I used silk leaves on which we wrote what the girls are thankful for and glued it all on card stock. 
Paper plate turkey with construction paper feathers to write what we are thankful for.
Sensory Turkeys:
We filled latex gloves with rice, beads, shaving cream, and water and had the girls guess what's inside. This was a great sensory activity and the girls especially loved watching the shaving cream ooze out from a tiny hole in one of the gloves.
 Ok, so not exactly a great turkey look a like. 
 Made this cute little Mayflower using a coffee sleeve, popsicle stick and paper sail. Full directions here. I asked my daughter what she was thankful for and she said letters....

Now a little craft for me. 
I love wreaths, but have never made or owned one before.When I saw a foam wreath in the Target dollar section, I knew I had to give it a try. 
I wrapped the wreath in twine, also from a dollar store. This was time consuming but I did it while watching a movie so the time went by pretty quickly. Used straight pins to secure twine to back of wreath.  
 Decorated the wreath with silk leaves and flowers. Voila! You can have your Thanksgiving guests help personalize your wreath by writing what they are grateful for on each leaf.


Thursday, November 8, 2012

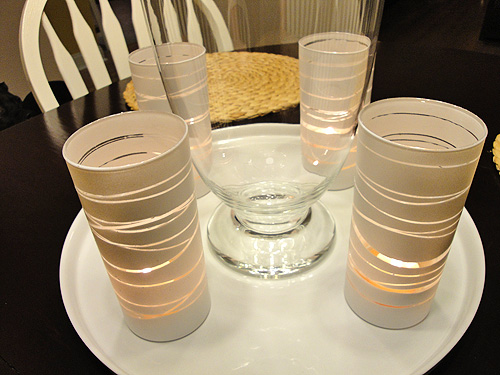
Rubber Band Vases

spray paint rubber band candle holders
Photo Source

Saw these on line and fell in love.
So easy and cheap!

Get your hands on some glass votives, wine glasses, vases. Place rubber bands around it and spray with white or frosted glass spray paint.

I was really excited about his project. However, my lines did not come out as neat as I would have liked.
I haven't given up. I've got two cans full of spray paint and will try again. Maybe waiting longer for the vase to dry before removing bands will do the trick. Hoping others have better luck with this project! Please share your techniques below.

Also, check out some other ways to fancy up some plain old vases at Design Megillah
How gorgeous are these?

Wednesday, November 7, 2012

Parshat Chayei Sarah Project, Activities, and Crafts

In this week's parasha, Avraham sends Eliezer to Charan to find a suitable wife for Avraham's son Yitzchak. Eliezer is sent on his way with a caravan of camels and gifts for the future bride. While in Charan, Eliezer asks  G-d to send him a woman who would not only fetch water for him when he asks for it, but fetch water for his camels as well. Rivkah does this for Eliezer and is chosen to marry Yitzchak. Yitzchak falls in love with her and they marry.

Since the well is a significant part of the parasha, we did a little science lesson on wells.
Considering I knew nothing about natural wells, I did some research and found out that well water comes from aquifers.
"An aquifer fills with water from rain or melted snow that drains into the ground. In some areas, the water passes through the soil on top of the aquifer; in others, it enters through joints and cracks in rocks. The water moves downward until it meets less permeable rock. 

Aquifers act as reservoirs for groundwater. Water from aquifers sometimes flows out in springs. Wells drilled into aquifers provide water for drinking, agriculture, and industrial uses. Aquifers can dry up when people drain them faster than nature can refill them. Because aquifers fill with water that drains from the surface of the Earth, they can be contaminated by any chemical or toxic substance found on the surface". (National Geographic)
Photo Source
So now I have a basic understanding of it, but how will my preschooler? Well have no fear
The Incredible Edible Aquifer is here:
The Incredible Edible Aquifer
Photo Source

 Here is the recipe I got from this site to make my own edible aquifer:

Edible Treat                                  Corresponding Layer of Earth

Bottom of cup (not edible).........................Bedrock

Ice, Sprite, & blue dye...............................Lower Aquifer

Ice Cream..................................................Confining Layer

Ice..............................................................Upper Aquifer

Chocolate Cookie Crumbs.......................Soil

Green Sprinkles........................................Plant Life

Straws.........................................................Well Casing

Your Mouth................................................Well Pump

I explained the lower aquifer as being rocks that water can go through. My daughter was able to see this happen as I poured the soda over the ice. I told her the next layer (ice cream) was like clay and the upper aquifer was more rock that water can go through. The cookies are the  dirt, the green sprinkles are plants and your mouth is the pump pulling up the well water.

For those who are a little more handy, you may want to try making this functional well I found via Parsha Projects which was originally posted on Inna's Creations:
Toy water well
Photo taken with permission from Inna's Creations
Check out her site for a full set of directions


We continued our parasha study with role playing.
 We used a toy camel, a treasure chest full of jewelry and a homemade well made from popsicle sticks and a toilet paper roll.

We made some jewelry using fruit loops and a pipe cleaner (inspired by Meaningful Mama


Tuesday, November 6, 2012

Chika Chika Boom Boom Activities

Chicka Chicka boom Boom is probably the most read book in our home right now. 
The rhythm is catchy and the story line humorous. 

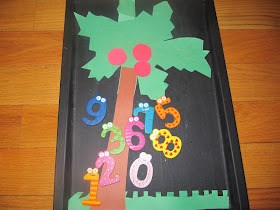
I was inspired by I Heart Crafty Things to create this fun interactive activity to go along with the book.

 I first used parchment paper to trace an outline of the coconut tree.
Then I traced the parchment paper outline onto green construction paper and cut the tree top out. 
 To complete the tree, I stuck the tree top and trunk onto a cookie sheet using double sided tape.
Get your magnetic letters ready and have your child follow the letters in the book as they climb up the tree.
(I couldn't find lower case letters to match the book, so I just used the upper case letters I had on hand).
We also made the edible coconut tree as seen on I Heart Crafty Things

For fans of Chicka Chicka 123, the above craft can be easily adjusted

Just replace the coconuts with apples, get some cute magnetic numbers and you're all set!


Monday, November 5, 2012

Planting the Seeds of Gratefulness in Children


Teaching our preschooler to be grateful is become an increasing challenge for us. The other day we took her out for doughnuts followed by a stop at the supermarket. While leaving the supermarket, she began to cry "But, I didn't get anything!!" My husband and  I could not believe our ears. "How could she be so ungrateful!? Just a few minutes ago she had been enjoying her pink doughnut ( a very rare treat)!"

We do understand that she is 3 years old and that developmentally preschoolers can be very egocentric and mostly relate to the here and now. However, we are committed to planting the seeds of gratefulness into our children and watch their appreciation blossom steadily over time. 

Grateful children understand the efforts of others to do things for them and are more empathetic to others. "A 2003 study at the University of California at Davis showed that grateful people report higher levels of happiness and optimism -- along with lower levels of depression and stress" (Parent.com).

Here are some tips to help instill thankfulness in ourselves and our children:
  • Express your gratefulness frequently. Have your children hear you say things like "Wow what a beautiful day!, I'm so happy to spend the day with you!, We are so lucky to have such a great family!" Daily prayers are an ideal place to verbalize thankfulness
  • Give your children responsibility. We appreciate things more when we have to work for them. With appropriate "jobs" given to children they will realize the effort that goes into the things we do for them and hopefully appreciate them more.
  • Become active members of a goodwill project. Unfortunately, with the devastation brought on by Hurricane Sandy there are countless opportunities to give back. We have been given the opportunity to bring water to the elderly in high risers with no power, cooked food to people who had to evacuate, and warm winter clothes to children living in homes with no heat. I mention these only to show how simple it can be to give back. Having your kids active in these deeds will help them empathize for others and be sensitive to the needs of others. All things truly grateful people can do.
I would love to hear what others are doing to increase a sense of appreciation in their homes:


vote for best new homeschool blog


The Homeschool Post

Jewish Homeschool NYC has been nominated for BEST NEW BLOG in the 2012 Homeschool Blog Awards. If you like what you see please vote! You may vote every day from each of your devices until Nov 16, 2012

Wednesday, October 31, 2012

Parshat Vayera: Crafts, Projects, Activities

Many of this week's parasha's central themes like Hachnasat Orchim (showing hospitality to the stranger) and Avraham's travels were in last week's parasha as well. We focused on those concepts last week and you can find many related activities on my Parashat Lech Lecha post.

Here are some new ideas for Parshat Vayera.
Photo Source
Guest Catching(Idea taken directly from Parasha Activities)


Activity: Everyone grabs part of a sheet, so it’s suspended in the middle. Explain that this is Avraham’s tent, and any guest that comes by must be brought into the tent. Throw the balloons into the air one at a time, while the kids run around with the sheet and catch them all. Make sure as each guest comes in, the old ones don’t fall out!


(idea taken directly from the Examiner)

1. Draw or print a picture of a women on cardboard.
2. Pour salt into several small containers and color them with food coloring
3. Keep spreading thin layers of glue with paintbrush over small areas of the picture and sprinkle your desired color of salt. Shake off any extra salt.
4. Repeat until picture is complete and let dry.
5. If needed, use tempera or acrylic paint to define outlines.


Tuesday, October 30, 2012

More Indoor Activities for Kids

We continue to wish everyone an easy recovery from this storm. 
Hurricane Sandy is over, but she took her toll on many. Our hearts go out to those whose lives and homes were taken by this storm.

For those looking for more things to do with the kids at home for the next few days. Here are some science experiments and paint activities to try out:
Fill up Ziploc bags with finger paint for a no mess art activity.

 Clearly, taping it down to the table just meant rip it off and step on it, but it made for cool art.

Cup painting with stryofoam cups

Great idea for making the Olympic circles or can be used to make sporting balls for sports theme birthday.

Marble Painting

Place paper in metal tin and roll marbles around for fun abstract art.

Messy hands are inevitable with the marble painting.


Pour baking soda into a metal tin and have kids use medicine droppers filled with colored vinegar to see a sizzling chemical reaction.

Lastly, Carbon Dioxide filled Balloon: 
Use a funnel to fill half of a balloon with baking soda.

 Fill a bottle 1/3 of the way with vinegar.

 Carefully place balloon over bottle without letting baking soda into bottle.

Voila, the reaction between the baking soda and the vinegar creates carbon dioxide which inflates the balloon.